Estimated reading time: 6 minutes

This annual garage door inspection can be performed in about 15 minutes. You should have the following:
- a tape measure and a flashlight
- a wooden 2 x 4 about six inches long, and the garage door remote control
- a ladder or step stool may be helpful.
CAUTION: You should perform this inspection in the order listed below, and if you answer no to any of the steps in #3, #4, and #5, stop and call a professional garage door company.
1. Manual Release Handle
UL 325 is Underwriter Laboratory’s garage door opener safety standard. Specifically, it applies to electric operators for doors, draperies, gates, louvers, windows, and other opening and closing appliances rated 600 volts or less (that’s specific, all right).
Among other details, it states your garage door opener (operator) must have a safe means of detaching the door from the operator. To inspect it, from inside the garage with the door fully closed, look for a rope with a red handle. It should not hang more than 6 feet above the garage floor.
2. Check for warning labels
You should be able to see warning labels present on the door panel, on the wall beside the operator button, and the bottom corners of the door.
3. Inspect the door panels
- Are handles or suitable gripping points inside and outside the door? They should be clear of all pinch points.
- Does the door move freely, without difficulty, and not more quickly than the force applied?
- Do the rollers stay on track during operation, and does the door stay fully open?
- The door should stay in the half-open position – Here’s how to check: With the door fully closed, pull the rope and disconnect the door from the operator. Without straining yourself, manually lift the door by grasping the door in a safe place where your fingers cannot be pinched or injured. Raise the door to the fully open position, lower it to the halfway open position, and then close it. The door should stay in place (balance) without your help.
If you answer “no” to any of the above scenarios, a trained garage door technician should inspect the door system before proceeding with the balance section of the inspection. If all answers are yes, reconnect the door to the operator.
4. Wall Station Push‐Button
The door should have one working wall‐mounted push button for each door. The buttons should be installed in clear view of the door, away from moving parts, and be installed five feet above an adjacent walking surface. The idea is to prevent the door from being operated by children.
5. Entrapment – Photoelectric Sensors Location
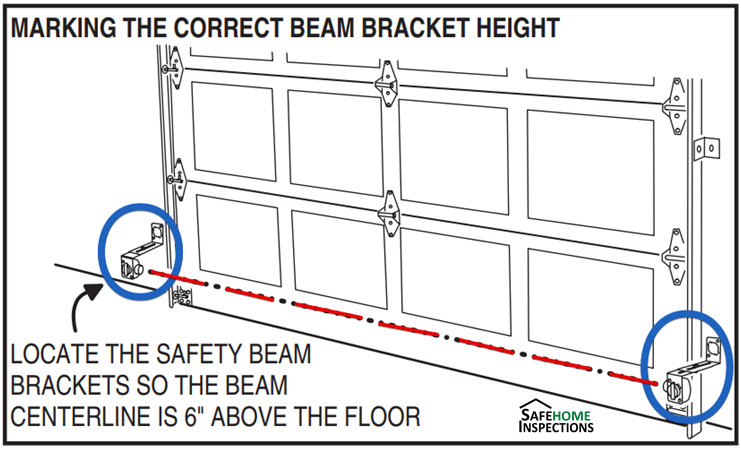
According to the U.S. Consumer Product Safety Commission (CPSC), between March 1982 and October 1992, 54 children under the age of 15 died, and 37 sustained serious injuries resulting from their being trapped when an automatic garage door failed to stop reversing its direction. See the updated congressional ruling here. Here’s how to inspect this feature.
- If present, is the beam no higher than six inches above the floor?
- If not present, can it be verified by the door operator manufacturer that photoelectric sensors are not necessary?
- Federal law states that residential garage door operators manufactured after 1992 must be equipped with photoelectric sensors or other safety-reverse features that meet UL 325 standards.
- Photoelectric sensors will typically be found near the floor, mounted to the left and right sides at the bottom of the door opening. Confirm the six-inch distance. If the entrapment sensors are missing, consider replacing the operator.
6. Photoelectric Sensors Reversal Test
Does the door immediately reverse and return to the fully open position? Here’s how to check:
Standing inside the garage but safely away from the door’s path, use a remote control or wall button to close the door. As the door is closing, wave an object in the path of the photoelectric sensor beam. The door should reverse its travel and return to a fully open position.
7. Spring and Hardware Inspection
Are all hardware parts securely and appropriately attached? Check the springs for signs of rust and deterioration.
With the door in the closed position, visually inspect the springs for rust, damage, and general wear. Visually check the door hinges, brackets, and fasteners for loose screws or bolts.
If the door has an operator, check that the connection to the door and the garage walls are secure. If the door has operator reinforcement, check that the reinforcement is securely attached to the door.
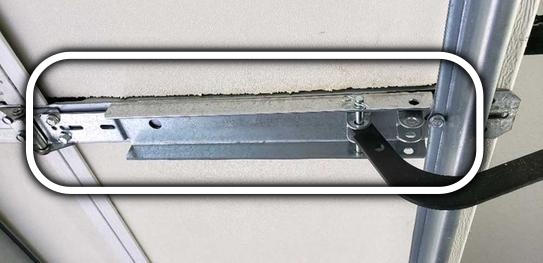
8. Spring Containment
Are counterbalance springs and their attachment components restrained by a cable or shaft?
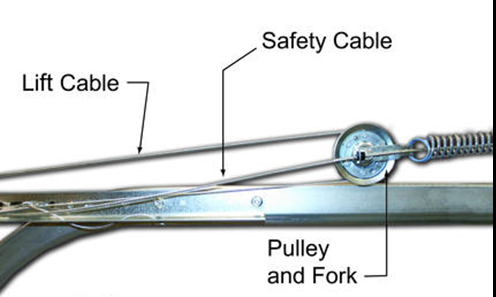
There are two types of counterbalance systems, torsion springs mounted above the door header and extension springs usually found next to the horizontal tracks supporting the door when open.
When and if a worn spring breaks, a containment method will help prevent the broken parts from flying around dangerously in the garage. A fellow inspector in Washington State, Dylan Chaulk, mentioned this risk in one of his well-written articles.
If you have torsion springs, they’re already mounted on a shaft (over your door, on the wall), which inherently provides containment. Check for a containment cable threaded through the spring if the door has extension springs.
9. Contact Reversal Test
When the door contacts a 2’x4’ laid flat, does the door automatically reverse direction and return to the fully open position? Here’s how to check:
Begin this test with the door fully open. In the center of the door opening, place a 2 x 4 flat on the floor in the door’s closed path. Standing inside the garage but safely away from the door’s path, use a remote control or the wall button to close the door. The door should reverse direction and return to the fully open position. The door may need servicing, based on findings in Items #3, 4, 6, 7, 8, or 9 above before this test is conducted.
Great! Am glad it was of benefit – so dangerous (these big doors). Largest moving component in the home! Subscribe to our blog and keep up with us over on our home inspection profession support website where we cover interesting topics and news/events affecting the inspection industry. The site: http://www.todayshomeinspector.com
I can see why it would be essential to inspect the photoelectric sensors on your garage door. It seems like ours have recently started to break down. It can definitely be a safety hazard, so I know that we should look into having them repaired as fast as possible.
I didn’t know garage doors had to have these specific 4 warning labels. I guess that helps keep their users safe. I’ll have to make sure my dorr’s warnings are still there.
Thanks for this! Very useful resource. I’ll be sure to give my customers a link to this article.
Gary
This is a great article. Being in the garage door industry it is so unusual to find others who are not that have the knowledge you do. Most people never think about the fact that the garage door is the largest moving part in your home and can weigh hundreds of pounds and in some cases even 1000 pounds. When they break and come crashing down they can do considerable damage or injury.
Glad to know there are inspectors such as yourself who are doing a complete check